Whipping your data into shape with SAS : Part 1 for Today
I’m sure I’ve written about this before – after all, I’ve been writing this blog for 10 years – but here’s something I’ve been thinking about:
Most students don’t graduate with nearly enough experience with real data.
You can use government websites with de-identified data from surveys, and I do, but I teach primarily engineering and business students so it would be helpful to have some business data, too. Unfortunately, businesses aren’t lining up to hand me their financial, inventory and manufacturing data (bunch of jerks!)
So, I downloaded this free app, Medica Scientific from the app store and ran a simulation of data for a medical device company. Some friends did the same and this gave me 4 data sets, as if from 4 different companies.
Now, that I have 4 Excel files with the data, before you get to uploading the file, I’m going to give you a tip. By default, SAS is going to import the first worksheet. So, move the worksheet you want to be first. In this case, it’s a worksheet named “Financials”. Since SAS will use the first worksheet, it could just as well be named “A whale ate my sandwich”, but it wouldn’t be as obvious.
While you are at it, take a look at the data, variable names in the first row. ALWAYS give your data at least a cursory glance. If it is millions of records, opening the file isn’t feasible and we cover other ‘quick looks’ in class.
These steps and the next few use SAS Studio, which is super-duper helpful for online courses.
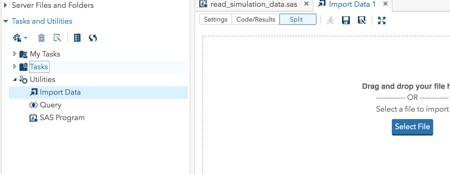
1. Upload the file into the desired directory
2. Under Tasks and Utilities select Utilities and then Import Data
3. Click select file and then navigate to the folder where your file is and click open
4. You’ll see a bunch of code but nothing actually happens until you click on the little running guy.
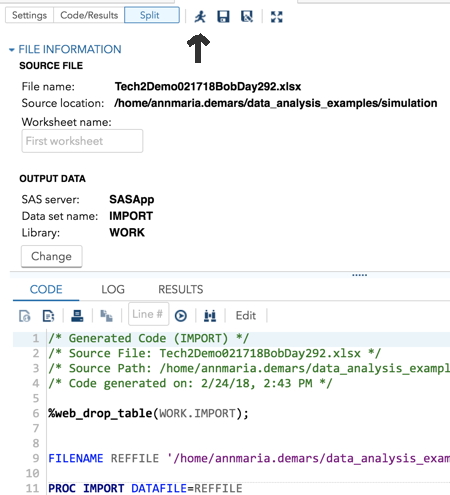
Okay, now you have your code. Not only has SAS imported your data file into SAS, it’s also written the code for you.
FILENAME REFFILE '/home/annmaria/examples/simulation/Tech2Demo.xlsx';

PROC IMPORT DATAFILE=REFFILEDBMS=XLSX OUT=WORK.IMPORT1;

GETNAMES=YES;

RUN;

PROC CONTENTS DATA=WORK.IMPORT1;

RUN;
Now, if you had a nice professor who only gave you one data set, you would be done, which is why I showed you the easy way to do it.
However, very often, we want to compare several factories or departments or whatever it is.
Also, life comes with problems. Sigh.
One of your problems, which you’d notice if you opened the data set is that the variables have names like “Simulation Day” . I don’t want spaces in my variable names.
My second problem is that I need to upload all of my files and concatenate them so I have one long file.
Let’s attack both of these at once. First, upload the rest of your files.
Now, open a new SAS program and at the top of your file, put this:
OPTION VALIDVARNAME=V7 ;
It will make life easier in general if your variable names don’t have spaces in them. The option above automatically recodes the variables to valid variable names without spaces.
Now, to import the next 3 files, just create a new SAS program and copy and paste the code created by your IMPORT procedure FOUR TIMES (yes, four).
From Captain Obvious:

Although you’d think this would be obvious, experience has shown that I need to say it.
- Do NOT copy the code in this blog post. Copy the code produced by your own IMPORT procedure, it will have your own directory name.
- Do NOT name every output data set IMPORT1 because if you do, each step will replace the data set and you will end up with one dataset and be sad.
Since I want to replace the first file, I’m going to need to add the REPLACE option in the first PROC IMPORT statement.
OPTION VALIDVARNAME=V7 ;
FILENAME REFFILE '/home/annmaria/examples/simulation/Tech2Demo.xlsx';

PROC IMPORT DATAFILE=REFFILEDBMS=XLSX

REPLACE

OUT=WORK.IMPORT1;

GETNAMES=YES;

RUN;

PROC CONTENTS DATA=WORK.IMPORT1;

RUN;
FILENAME REFFILE '/home/annmaria/examples/simulation/Tech2Demo2.xlsx';

PROC IMPORT DATAFILE=REFFILEDBMS=XLSX

REPLACE OUT=WORK.IMPORT2;

GETNAMES=YES;

RUN;

PROC CONTENTS DATA=WORK.IMPORT2;

RUN;
Do that two more times for the last two datasets
Did you need to do the utility? Couldn’t you just have done the code from the beginning? Yes. I just wanted to show you that the utility existed. If you only had one file and it had valid filenames, which is a very common situation, you would be done at that point.
In a real-life scenario, you would want to merge all of these into one file so you could compare clinics, plants, whatever. Super easy.
[IF you have write access to a directory, you could create a permanent dataset here using a LIBNAME statement, but I’m going to assume that you are a student and you do not. The default is to write to the working directory. ] ;
DATA allplants ;

set import1 - import4 ;
IF you get an error at this point, what should you do?
There are a few different answers to that question and I will answer them in my next post.
 YOU CAN DOWNLOAD A SPIRIT LAKE DEMO FOR YOUR WINDOWS COMPUTER FROM THE MICROSOFT STORE